Custom job type with advanced options plug-in
Provides an overview of the custom job-type with advanced options plug-in.
In HCL Workload Automation and IBM Workload Scheduler for z/OS, you can create jobs of different types. The job type determines the characteristics of the job. For example, a file transfer type job has all the characteristics necessary to perform a file transfer. When you select to create a job of this type, you are invited to enter the file transfer parameters (which file, from where, to where) in a dedicated panel on the Dynamic Workload Console.
When you choose a job type in the Dynamic Workload Console the job types are divided into two groups:
- Jobs with standard options
- The basic jobs that run scripts and commands.
- Jobs with advanced options
- These run more specialized jobs. They are implemented with a plug-in, and can be run only on workstations where the dynamic agent has been installed, even if they are not to be scheduled dynamically. In the Dynamic Workload Console, you choose from a set of these job types which cover the more common activities that an organization might want to run (for example, File Transfer, Web Services, Database, and Java™). However, if you want to schedule a type of job that has different requirements from any of those pre-defined job types, you can create your own plug-in to add a new job type appropriate to your business needs. Do this with the Integration Workbench.
- If the operation is performed on the HCL Workload Automation Connector, display and run access is required on the CPU corresponding to the workstation where the job is created.
- If the operation is performed on the workstation where the job runs, display access is required on the workload broker workstation.
The anatomy of a custom job-type plug-in
A custom job-type plug-in consists of:- A Dynamic Workload Console panel where the user enters the job definition details
- The server part of the plug-in which performs optional validation and creates the job definition
- The agent part of the plug-in which runs the job on the target workstation
The steps to create a custom job type plug-in
The creation of a custom job type plug-in requires the following steps:- 1. Design a graphic interface panel
- You generate your own panel for the Dynamic Workload Console to be used
as an input form for your custom job type. You use the Abstract User
Interface Markup Language (AUIML) VisualBuilder tool to create a user
interface panel. You can add:
- Buttons
- Check boxes
- Combo boxes
- Edit boxes
- List boxes
- Groups
- Radio boxes
- Dynamic lists
- Dynamic pairs lists
Note the following restrictions:- When you name your GUI objects, do not use the tws prefix
which is reserved for internal use. For the same reason, avoid using
the following terms as distinct names (but they can be parts of strings):
- name
- member
- workstation
- job
- jobstream
- No two level of nesting is allowed for check box or radio groups. Also, you cannot place required fields in two level nested groups.
If you include user name and password fields in your panels, you can take advantage of the following widget (provided with the product) that enables the user (who would define the job in most cases) to choose the source for the requested password. The widget is displayed by clicking on an ellipsis (...) button placed next to the password field and it looks as follows:where the choices are as follows: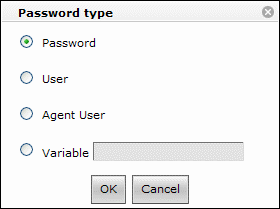
- Password
- Takes the password value entered in the Password field.
- User
Adds the ${password:value_of_user_name_field} string in the password field.
- On dynamic agents
- It is resolved at run time with the password value defined for User
Name in the HCL Workload Automation database
using either the User definition panel or the composer
user command.
You can also specify the user (and its password) of another workstation if it is defined in the database. See the description of the Variable button.
Attention: User definitions lack referential integrity. This implies that, if a user definition referenced in the credentials section of a job is changed or deleted, no warning or error message is returned until the job is run. - On IBM Workload Scheduler for z/OS agents
- It is resolved at runtime with the password value defined for User Name in the IBM Workload Scheduler for z/OS database using the USSREC initialization statement, where the value of User Name is defined by the USRNAM parameter and the password by USRPSW.
- Agent User
Adds the ${agent:password.value_of_user_name_field} string in the password field.
It is resolved at runtime with the password value defined for User Name locally on the dynamic agent or IBM Workload Scheduler for z/OS Agent that will run the job (or on any agent of a pool or dynamic pool that may run the job) with the param command.
- Variable
It is resolved at runtime with the value defined for the variable you enter in the field (using the ${variable_name} notation).
- On dynamic agents
- The variable must have been defined either locally on the agent,
using the param command, or in the HCL Workload Automation database,
utilizing the User panel or the composer
username command. For example:
- A variable defined locally on the agent, enter here as:
${agent:file_With_Sections.password.dbPwd} - A variable defined in the database, enter here as:
${password:workstation#user}
You can use this button to specify the password of the remote user of a different workstation (as long as it was defined in the database) by entering the following string in the adjacent field:${password:workstation_name#value_of_user_name_field} - A variable defined locally on the agent, enter here as:
- On IBM Workload Scheduler for z/OS agents
Use this field if you want to utilize the password defined for a user different from the one specified in the User Name field.
For example if you are defining a File Transfer job and the local and remote user names are identical (user1), you can differentiate the password by defining two USRREC initialization statement entries (for example one for user1 and one for user1remote). After doing this, in the remote user password field you specify:${password:user1remote}The traditional variable substitution mechanism which uses variables defined in the IBM Workload Scheduler for z/OS database variable tables is not supported in this field.
BINDING="passwordSelector#modeling.widgets.password.PasswordSelector: <userName>" - 2. Optionally add buttons to the panel to perform service actions
- You can add buttons to your custom-made panels in the Dynamic Workload Console, for example
to perform the following service actions:
- Open a pick list of possible values for a job parameter from the connector
- Open a pick list of possible values for a job parameter from an agent
- A definition of the action in the AUIML plug-in definition
- An option which determines whether the action is to be performed on the connector (as an immediate and direct result of clicking the button)
- A method which performs the required action
- A field can be put in an error state with a message explaining what is wrong
- A pop-up menu can be displayed
- Diagnostic information can be traced on the Dashboard Application Services Hub
- A pick list can be displayed
- 3. Create a plug-in project
- Use the Integration Workbench to
generate a plug-in project. This step consists in creating a package with your plug-in files and all you need to deploy them. Do the following:
- On the toolbar select File→New→Project.... The New Project window opens.
- In the list of wizards double-click first on HCL Workload Automation and then on TWS Executor Project. The TWS Executor Project wizard opens.
- Enter a name for your project.
- Enter a package name for the plug-in.
- Enter the name of the job executor related to the plug-in.
- Enter the panel_filename.AUIML name (or use the search tool).
- Enter the names of the one or more panel_filename.properties files (or use the search tool to select them).
- Enter the name of the related icon file (or use the search tool). The icon file can be of type PNG only.
- Click Finish.
The wizard creates the executor project and generates:- An .XSD file that defines the schema of the job definition
- All the classes required to map the JSDL file
- A labels.properties file where you can insert your labels
To insert more labels, edit labels.properties located in the RESOURCES folder for the project. The file already includes a default label. Add each localized label in the format:
using the same locale used in the corresponding properties file.language code = labelThe plug-in ID is the plug-in name in lower case.
- Edit the plug-in project files
- Edit the files created for the project:
- Give a name to the panel that will be shown in the New ► Job Definition drop-down menu on the Dynamic Workload Console (you can add localized names as well)
- Set the plug-in version if you do not want to use the default of 1.0.0
- Add messages, including any localized messages, that you want to refer to in your coding
- Code any validation that you want performed, both on input and on execution
- Create pick lists for field values
- Code any special output requirements you need for this job type
- 4. Test the plug-in
- Use the test project (automatically generated by the TWS Executor Project wizard when you created the plug-in project) to test the plug-in.
- 5. Deploy the plug-in
- Export the packaged plug-in files from the Eclipse workbench to
a folder in your, or another, computer so that you can then install
them on the agents and make them operational. Do the following:
- In the Package Explorer panel right click on the package name and select Export....
- In the Export window double-click first on HCL Workload Automation and then on TWS Executor. A list of defined TWS Executor projects is displayed.
- Select the project in the list and enter the destination folder in your or another computer.
- Click Finish.
This results in the creation of a jar file named plug-in_id_version.jar (where plug-in_id is the name of your plug-in in lower case) in the destination folder of the computer you selected. This name cannot be modified.
- 6. Install the plug-in on the master domain managers, dynamic domain managers, and related backup workstations, if any
- Copy the jar file of the plug-in into the installation_dir/TWS/applicationJobPlugIn path master domain managers, dynamic domain managers, and related backup workstations, if any. Restart the WebSphere Application Server to make the changes effective.
- 7. Install and configure the plug-in on the agents
- Do the following:
- Copy the plug-in into the ../TWA/TWS/JAVAEXT/eclipse/plugins path of every dynamic agent where you want to run it.
- On every agent edit the config.ini file located
in path ../TWA/TWS/JAVAEXT/eclipse/configuration by
adding the line:
where plug-in_id is the name in lower case of your plug-in.plug-in_id@4:start