Designing your Workload
Before you begin
- From the navigation toolbar, click Administration > Workload Design > Manage Workload Definitions.
- In the displayed panel, specify the engine connection you want to use. Only the categories of objects supported by the engine that you selected are available.
- Same user connected to multiple engines
- Multiple users connected to the same engine.
When you open the Workload Designer, the window displays a list of new objects you can create, and a list of the most recent objects that were edited, and a Search tab for searching on object names.
Select an object in the Create New list to create a new object definition or search for an object in the Search field. Click on Advanced to open the advanced search panel. Select one or more objects to open them in edit mode by clicking the Edit button. The open objects are locked in the database until you finish editing and save them.
When an object is open in edit mode, its properties are displayed in the right pane, where you can view and edit them either in the Details view or the Graphical View.
You can add additional objects to the object in edit mode by either right-clicking the object or searching for an object in the Search field. Select an object from the list of results, and click add (+) to add the object to the view of the existing object. For example, you can search for jobs and automatically add them to the job stream you are editing, or add other objects as dependencies, such as resources or prompts.
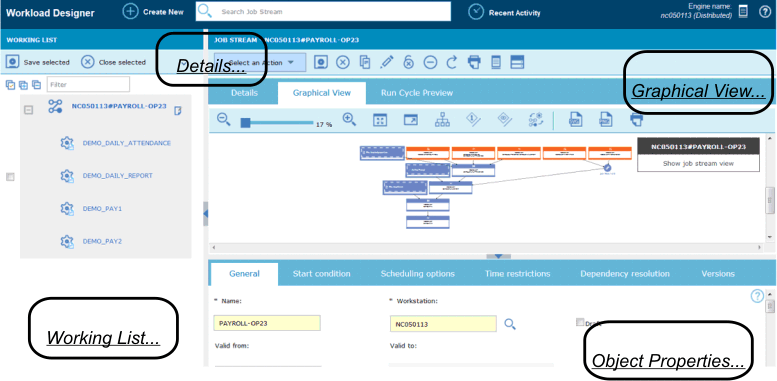
When you select the objects you want to work on, the following window is displayed, showing several working areas that you can use, depending on the task you want to perform.
Click the links in the picture below to find more information about each pane:

Editing objects from the Working List View
About this task
Procedure
What to do next
By hovering with the cursor over the icons located on the toolbar, you can see all the actions you can perform on the selected objects.
Editing objects from the Details View
About this task
Procedure
What to do next
Editing objects from the Graphical View
About this task

From the Graphical View you can edit an object in any of the following ways:
Procedure
- Select it and click the
 button.
 - Right-click it and choose an action from the context menu. Only actions available for the selected item are displayed in the menus.
- Select an object or an arrow and use the buttons on the graphical view toolbar to create or remove dependencies.
Editing object properties
About this task
The properties pane is divided into tabs, which contain options and properties relating to the object currently open.
If you have more than one object open in the Working List, the properties displayed in this pane are relating to the object currently selected in the Details or Graphical view above.
 Edit
Edit is displayed on the right of the object.
 View
View Add
Add Create
like
 Edit
Edit Unlock
 Delete